Creating automated tasks in Naranga Lead Management
Creating automated tasks in Naranga Lead Management
Tasks in eMax allow you to send reminder emails to yourself and other users in your system to remind them of certain tasks they must perform to help move your lead through the Pipeline. If you would like to add a new Task, please click on the “Workflow” tab and then “Task Types. You then simply click the “Add Task” link on the upper right hand corner.

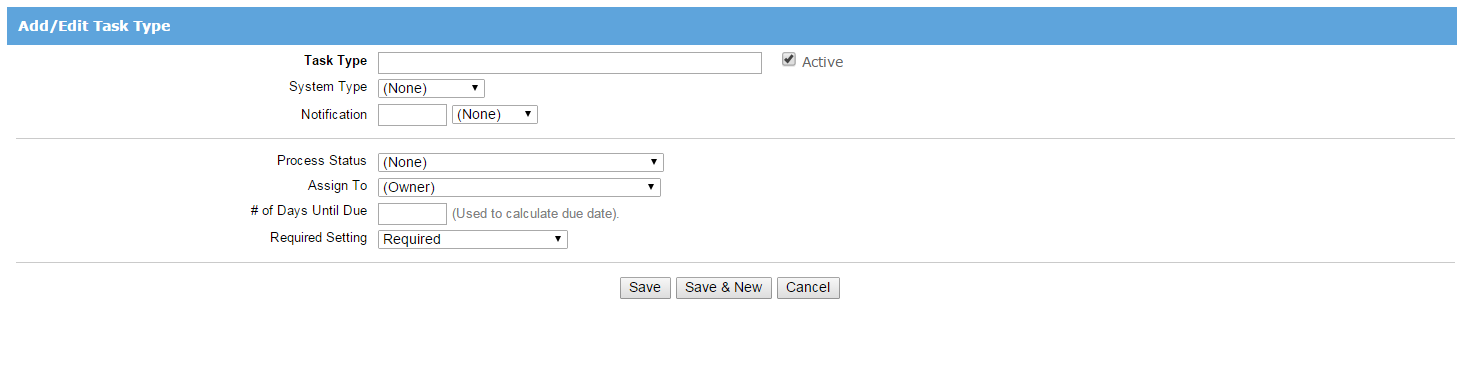
After clicking the link, you will be brought to this page:

You will see several fields to fill out. They are as follows.
- Task Type – This is where you name the task. It can be anything that allows you to understand the task. Please keep the description brief and under one hundred characters.
- Active – This is the box you check to make the task active. If this is not checked, the task will not be assigned to anyone.
- System Type – What kind of action you want the broker to take. You have the option to set it as a Call, Email, Other, Send Packet, or Voicemail.
- Notification – These are two fields that are set to determine when the person assigned the task will receive an email reminder. If this is not set, the broker will not receive an email. You will need to set a number in the first field, then select minutes, hours, or days in the drop-down menu.
- Process Status – This is a drop-down of all your system's Sales Statuses. Whatever status you want the task linked to, you will select it here.
- Assign To – This is a drop-down to select who the task will be assigned to. The default value is “Owner”, meaning whomever the lead is assigned to, will also be assigned the task. If you assign it to a specific user, they will get the task.
- # of Days Until Due – This is used to calculate when the task will be due and is used in conjunction with the Notification field to determine when an alert is sent. You must fill out a value here to have an email sent, as well as have the task populated on the calendar. The value will always be in days as well.
- Required Setting – This is a drop-down that determines if the task is required or optional.
Fill out the task the way you want it to be set up, and hit “Save”.

The task we have created will be assigned to the Owner whenever the “Contacted” sales status is set. The owner will be asked to send a packet to the lead, and they will get an email notification 15 minutes before the task is due, which will be five days after the task was created. This is also a required task, so they must fulfill the request. When the task is created, you will now see it on the “Task Types” page.
If you need to make a change to any task, it as simple as clicking on the name of the task and making the changes you want. Once you hit save, they will be reflected on the “Task Types” page.
If you have more than one task you would like to add, you can use the “Batch Add” link. It will take you to this page:

To have the alert triggered, you will need to open a candidate profile and click on the “Sales Activity” tab.

You will want to check the box next to the “Status” that the task is connected to. This will populate the “Due Date” allowing the alert to be sent to the selected person.

Press the “Save” button when you are done.
Help Desk Hint: If a broker does not receive an alert for a task, please verify first that both the “Notification” and “# of Days Until Due” fields have data in them. If those are populated, please have the broker verify they are signed up to receive task in their “Users Settings” and that they have a “Time Zone” set in their settings as well. This can be accessed in the upper right hand corner of the system.
If they click on that link, they will be taken to a page where they can manage their settings. They will need to make sure that the “Task Email Alerts” checkbox is selected.
If that box is not checked, they will not receive the notifications at all. If that is also checked and they still have not received a notification, please have them look in their SPAM or Junk folders, as alerts can land there. Finally, if all those possibilities have been checked, please have your IT department verify that the “*.emaximation.com” is whitelisted. Once all of these have been verified, please contact the Help Desk .
Related Articles
Lead Management API Documentation
Lead Management API Documentation Lead Management API documentation can be found here . For testing, you will need to send an email to help@naranga.com to request the following information: -Username -Password -Client Id -Client Secret In the Swagger ...User Management - Lead Management
User Management - Lead Management Managing users in the Lead Management solution is a very simple task. You can handle most of it by clicking on the "Users" tab. This will bring you to the "User List" page, where you can see the status and permission ...Lead Automation
Lead Automation The below setup will initiate the leads from internet portals and corporate websites getting into Lead Management automatically. All lead forms need to be sent to the following in, plain text format: Company Name – ...Creating an Email Campaign
Email Campaigns Creating a new campaign is a very simple process. The first step is to find and click the "Add Campaign" When you click "Add Campaign" you will be taken to recognize at a glance. Please try to keep the name under one hundred ...My leads aren't automatically entering into Lead Management!
My leads aren't automatically entering into Lead Management! Whenever you notice that your leads from your corporate website or portals are not entering into the Lead Management system, the first thing to check is that we are copied on the emails ...